Seo Description We love when Karen Horvath of MG Creations by Karen stops by to teach us how to make something new! Today she is showing us how to make resin bookmarks that are simple to make and absolutely beautiful!
Karen has taught us how to make gorgeous coasters, key chains, and badge reels. And now she is showing us how to make resin bookmarks. These little beauties make great gifts for the teachers, students, and book lovers in your life. Which also makes them a big hit with your customers if you sell your handmade creations!

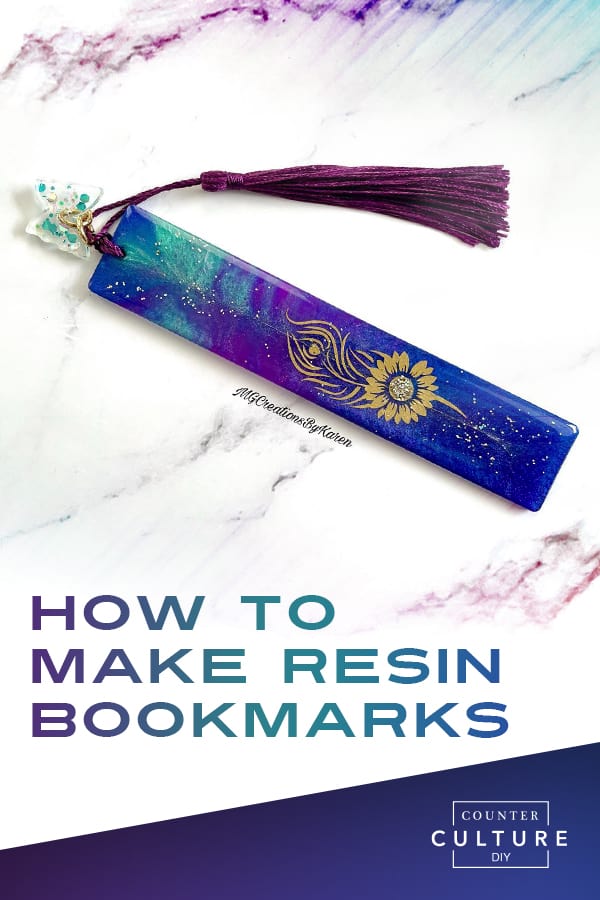
How to Make Resin Bookmarks
Once you know how to make this type of resin bookmark, you will be able to experiment with other methods too. Try different colorants, add glitter, or swirl the night away to make different patterns. Karen tells us exactly what supplies and colors she used to make her bookmarks.
So you will be able to use the same things Karen does and get a similar effect. But you can also use what you have on hand or what you love!
Why is My Resin Bookmark Bendy?
Having a bookmark that is flexible after curing is totally normal and know that it will fully harden with time. Karen explains that the long shape of the bookmark has something to do with the fact that it remains bendy even after 24-48 hours of cure time. It is also a thin mold which contributes to the flexibility lasting longer.
There is a simple solution though! Karen suggests waiting 7 days for your bookmarks to fully cure. Then they will be completely hardened and ready to ship or use. Karen also waits the 7 days before shipping her coasters. Just to make sure they are fully cured too.

What Type of Resin Can I Use for Bookmarks?
Karen explains that any type of Artist Resin will work well for the first layer of your bookmark. If you are in a hurry, she suggests that you use Thin Viscosity because it cures faster than Medium Viscosity or the original Artist Resin. Karen loves using UV Resin for her top layer.
Not only does it cure very quickly, it also gives superior shine and beauty to her bookmarks. If you don’t have UV Resin though, you can use Artist Resin for your first and second layers. You will still have fabulous results, you just have to wait a bit longer for the resin to cure.
Resin Bookmark Tips and Tricks
In the video below, Karen gives us lots of information and tips on how to make our bookmarks a success. One of the things she tells us it to make sure we fill our molds completely. Karen explains that a mold that isn’t completely full with give us a bookmark that has a lip on it.
To get a nice flat bookmark, look at your mold at an angle and at table height. That way you will be able to see if you have filled it all the way. If the mold isn’t full, simply add more resin until it is.

Another tip is to give your bookmarks a bit of sanding once they have cured. The corners and edges tend to be sharp. But a quick sand will smooth them right out.
Karen also reminds us to pay special attention to the corners of our molds. If little bubbles form underneath in the corners, the resin won’t settle into them all the way and your corners will be off. Check out the video below for all of Karen’s advice on how to make the best possible bookmarks!

Watch the Video Tutorial Here!

How to Make Resin Bookmarks
Materials
- Silicone bookmark mold
- Medium Viscosity Artist Resin
- Counter Culture DIY UV Resin
- Counter culture DIY UV light
- Galactic Grape Mica Powder
- Daphne Mica Powder
- All American Mica Powder
- Mermaid Mica Powder
- Counter Culture DIY Quick Coat
- Protective gloves
- Filter mask
- Silicone mat
- Mixing cups
- Mixing sticks
- medicine cups
- Glitter Spoon
- Torch
- Dremel (or similar tool) to cut the hole in your bookmark
- Tassel
Instructions
- Start by mixing equal amounts of Part A and B of the Artist Resin. Karen says it normally takes 10-15 ml total for her bookmarks. Stir the combined resin for 3-5 minutes to make sure it is thoroughly mixed.
- Next, pour the combined resin into 4 separate medicine cups. Each cup will be for one of your colors.
- Then add a tiny bit of Galactic Grape to one of the cups. Mix well. Then add a little at a time until you get the color you want.
- Repeat this process with the remaining 3 cups and colors.
- Next, grab a mixing up. Starting with one color, pour a third of it down one side of the cup. Then pour a third of the next color right on top. Repeat with the next two colors.
- Then repeat the same process until your all of the resin from your medicine cups is in your mixing cup.
- Now pour the resin in a small circle at one end of the bookmark. Make another circle next to it. Continue on until you have covered the length of the bookmark. This will take 4 circles. Then just let the resin spread and fill in the mold. Use your torch to pop any bubbles.
- Allow your bookmark to cure for 24 hours and then demold for the decal and second layer of resin.
- If using a name or image decal, apply it to your bookmark at this point. Then coat the decal with Quick Coat and allow that to dry.
- Next, squirt UV Resin onto the top of your bookmark and spread it out evenly. Then add a little more and smooth it out again. Use a kitchen lighter (a torch is too hot for UV Resin) to pop any bubbles. Then let the bookmark set for 5-10 minutes to let any other bubbles rise to the surface. Pop those with the lighter too.
- Then put the bookmark under the UV Lamp and allow it to cure. This will take about 3 minutes. Karen rests hers for a minute between each curing minute so the bookmark doesn't get too hot.
- Once the resin is cured, sand the edges and corners to smooth them out.
- Then use a Dremel to cut a hole in the top of the bookmark and add your tassel.
The Finishing Touches
And that’s how you make resin bookmarks! Similar in some ways to making coasters but still their own unique pretty selves. And you get to dress them up in their own way too. Once your bookmarks have cured, cut a small hole in the top and then add your tassel.
There are so many tassel options for you to choose from. And you can also add beads or other embellishments to make your bookmarks even more unique. Whatever supply and tassel options you choose, we hope you love this project and have fun with it.
We also want to give a big thank you to Karen for sharing her skills and knowledge with all of us again. If you loved learning from her and want to see more of here work, you can find her on Facebook and Instagram. And you can find more awesome video tutorials like this one on our YouTube channel!

Be sure to follow us on Pinterest so you can stay on top of everything that’s new and never miss a blog post!
If you want more inspiration and information we have a Facebook group for that. Join us in Counter Culture DIY Artist Support where we, and other artists, offer ideas, answer questions, and support each other!
Do you have an art project using any of our products that you want to share? Send it to us at support@counterculturediy.com, and we can feature them here!